1-20 of 73610
Keywords: VIKOR
Close
Follow your search
Access your saved searches in your account
Would you like to receive an alert when new items match your search?
Journal

Provides a platform for research and discussion across the range of disciplines involved in computer-aided engineering and software.
in Auxetic soft muscle actuators for enhanced flexibility in lower wearable rehabilitation robotics
> Engineering Computations
Published: 21 August 2026
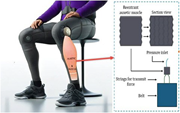
Figure 1 Schematic Drawing for the expected application of the new muscle A person sitting on a chair with a device on their leg, illustrating the application of a new muscle technology. A diagram of the expected application of a new muscle technology. The diagram shows a person sitting on a c... More about this image found in Schematic Drawing for the expected application of the new muscle A perso...
in Auxetic soft muscle actuators for enhanced flexibility in lower wearable rehabilitation robotics
> Engineering Computations
Published: 21 August 2026
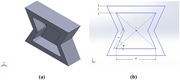
Figure 2 (A) 3D CAD model re-entrant (B) simplified deformed auxetic model A diagram of a 3D CAD model and a simplified deformed auxetic model. The image consists of two parts. The left part (A) shows a 3D CAD model of a re-entrant structure. The right part (B) shows a simplified deformed auxe... More about this image found in (A) 3D CAD model re-entrant (B) simplified deformed auxetic model A diag...
in Auxetic soft muscle actuators for enhanced flexibility in lower wearable rehabilitation robotics
> Engineering Computations
Published: 21 August 2026
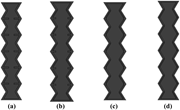
Figure 3 Sequence for the re-entrant structure with different cut widths (A) 25%cut (B) 50% cut (C) 75% cut (D) 100% cut Four vertical shapes with varying cut widths. The image displays four vertical shapes, each with different cut widths. The shapes are labeled as A, B, C, and D. Shape A has ... More about this image found in Sequence for the re-entrant structure with different cut widths (A) 25%cut ...
in Auxetic soft muscle actuators for enhanced flexibility in lower wearable rehabilitation robotics
> Engineering Computations
Published: 21 August 2026
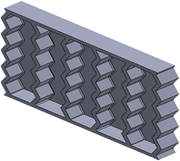
Figure 4 Isometric view of the re-entrant auxetic structure, showing its geometric configuration and design features An isometric view of a re-entrant auxetic structure. An isometric view of a re-entrant auxetic structure, displaying its geometric configuration and design features. The structu... More about this image found in Isometric view of the re-entrant auxetic structure, showing its geometric c...
in Auxetic soft muscle actuators for enhanced flexibility in lower wearable rehabilitation robotics
> Engineering Computations
Published: 21 August 2026
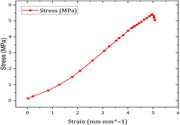
Figure 5 Uniaxial test data showing the stress–strain relationship used for FEA simulations A line graph showing the stress-strain relationship. A line graph with the x-axis labeled 'Strain (mm mmˆ-1)' ranging from 0 to 6 and the y-axis labeled 'Stress (MPa)' ranging from 0 to 6. The graph fea... More about this image found in Uniaxial test data showing the stress–strain relationship used for FEA simu...
in Auxetic soft muscle actuators for enhanced flexibility in lower wearable rehabilitation robotics
> Engineering Computations
Published: 21 August 2026
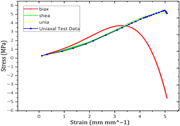
Figure 6 Yeoh 3rd order model used for fitting hyperelastic experimental data, describing the material's nonlinear stress–strain behavior A line graph showing stress versus strain for different models and test data. A line graph with the x-axis labeled 'Strain (mm mmˆ-1)' ranging from 0 to 5 a... More about this image found in Yeoh 3rd order model used for fitting hyperelastic experimental data, descr...
in Auxetic soft muscle actuators for enhanced flexibility in lower wearable rehabilitation robotics
> Engineering Computations
Published: 21 August 2026
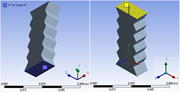
Figure 7 Fixed support location at the symmetrical base and displacement direction, simulating the auxetic muscle's fixation and deformation A diagram of a structure with fixed support and displacement direction. The diagram consists of two parts. The left part shows a structure with a fixed s... More about this image found in Fixed support location at the symmetrical base and displacement direction, ...
in Auxetic soft muscle actuators for enhanced flexibility in lower wearable rehabilitation robotics
> Engineering Computations
Published: 21 August 2026
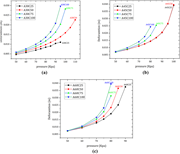
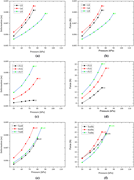
Figure 8 Results of FEA (A) 30º models, (B) 45º models and (C) 60º models Three line graphs showing deformation versus pressure for different models. The image contains three line graphs labeled (a), (b), and (c), each depicting deformation in meters versus pressure in kilopascals for differen... More about this image found in Results of FEA (A) 30º models, (B) 45º models and (C) 60º models Three l...
in Auxetic soft muscle actuators for enhanced flexibility in lower wearable rehabilitation robotics
> Engineering Computations
Published: 21 August 2026
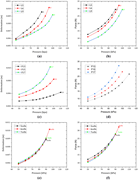
Figure 9 Results of FEA for 1 mm models (A) length change deformation (B) length change force (C) footage change deformation (D) footage change force (E) Number of cells change deformation (F) Number of cells change force Six line graphs showing deformation and force changes under different con... More about this image found in Results of FEA for 1 mm models (A) length change deformation (B) length cha...
in Auxetic soft muscle actuators for enhanced flexibility in lower wearable rehabilitation robotics
> Engineering Computations
Published: 21 August 2026
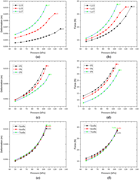
Figure 10 Results of FEA for 1.5 mm models (A) length change deformation (B) length change force (C) footage change deformation (D) footage change force (E) Number of cells change deformation (F) Number of cells change force Six line graphs showing deformation and force changes under different ... More about this image found in Results of FEA for 1.5 mm models (A) length change deformation (B) length c...
in Auxetic soft muscle actuators for enhanced flexibility in lower wearable rehabilitation robotics
> Engineering Computations
Published: 21 August 2026
Figure 11 Results of FEA for 2 mm models (A) length change deformation (B) length change force (C) footage change deformation (D) footage change force (E) Number of cells change deformation (F) Number of cells change force Six line graphs showing deformation and force changes under different co... More about this image found in Results of FEA for 2 mm models (A) length change deformation (B) length cha...
in Auxetic soft muscle actuators for enhanced flexibility in lower wearable rehabilitation robotics
> Engineering Computations
Published: 21 August 2026
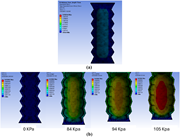
Figure 12 Simulation result for: (A) the Stress for one column (B) the deformation for one column A heat map showing stress distribution and deformation in a column under different pressure levels. The image consists of two parts labeled (A) and (B). Part (A) displays a heat map representing t... More about this image found in Simulation result for: (A) the Stress for one column (B) the deformation fo...
in Auxetic soft muscle actuators for enhanced flexibility in lower wearable rehabilitation robotics
> Engineering Computations
Published: 21 August 2026
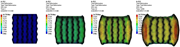
Figure 13 Simulation result for the deformation of five-column cells A heat map showing deformation of five-column structures. A heat map representing the deformation of five-column structures. The heat map is divided into four panels, each showing a different stage or condition of deformation... More about this image found in Simulation result for the deformation of five-column cells A heat map sh...
in Auxetic soft muscle actuators for enhanced flexibility in lower wearable rehabilitation robotics
> Engineering Computations
Published: 21 August 2026
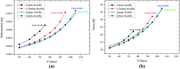
Figure 14 FEA results for best models (A) best model deformation comparison (B) best models force comparison Two line graphs compare deformation and force results for different models. The image contains two line graphs side by side. The left graph shows deformation in meters on the y-axis and... More about this image found in FEA results for best models (A) best model deformation comparison (B) best ...
in Auxetic soft muscle actuators for enhanced flexibility in lower wearable rehabilitation robotics
> Engineering Computations
Published: 21 August 2026
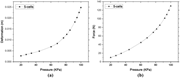
Figure 15 FEA results for best models (A) best model deformation comparison (B) best models force comparison Two line graphs compare deformation and force against pressure for a five-cell model. The image contains two line graphs side by side. The left graph plots deformation in meters against... More about this image found in FEA results for best models (A) best model deformation comparison (B) best ...
Journal Articles
Journal Articles
in Optimising the operation of district heating networks by combining forecasting and decision-making tools
> Engineering Computations
Published: 19 August 2026
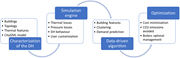
Figure 1 District heating optimisation system methodology A flowchart illustrating the methodology of a district heating optimization system. The flowchart illustrates the methodology of a district heating optimization system. The process begins with the characterization of the district heatin... More about this image found in District heating optimisation system methodology A flowchart illustratin...
in Optimising the operation of district heating networks by combining forecasting and decision-making tools
> Engineering Computations
Published: 19 August 2026
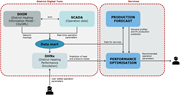
Figure 2 District heating optimisation algorithm concept A diagram of the district heating optimisation algorithm concept. The diagram illustrates the district heating optimisation algorithm concept. It is divided into two main sections: District Digital Twin and Services. The District Digital... More about this image found in District heating optimisation algorithm concept A diagram of the distric...