1-20 of 20422
Keywords: MINOR
Close
Follow your search
Access your saved searches in your account
Would you like to receive an alert when new items match your search?
Journal

Essential reading on the design and construction of civil engineering structures and its associated applied research.
Journal Articles
Proceedings of the Institution of Civil Engineers - Structures and Buildings 1–13.
Published: 21 July 2026
Journal Articles
Proceedings of the Institution of Civil Engineers - Structures and Buildings 1–17.
Published: 21 July 2026
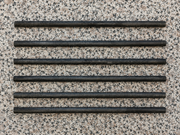
in Multiscale chloride resistance of recycled concrete with fly ash and ground granulated blast-furnace slag
> Proceedings of the Institution of Civil Engineers - Structures and Buildings
Published: 21 July 2026
Figure 1. Rust-removed HPB300 grade hot-rolled plain steel bars (14 mm dia.) A set of six cylindrical rods arranged in parallel on a speckled surface. More about this image found in Rust-removed HPB300 grade hot-rolled plain steel bars (14 mm dia.) A set...
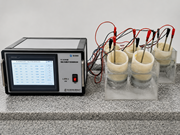
in Multiscale chloride resistance of recycled concrete with fly ash and ground granulated blast-furnace slag
> Proceedings of the Institution of Civil Engineers - Structures and Buildings
Published: 21 July 2026
Figure 2. Chloride ion penetration resistance testing apparatus A chloride migration test setup shows a control unit connected to six specimen cells with electrode. More about this image found in Chloride ion penetration resistance testing apparatus A chloride migrati...

in Multiscale chloride resistance of recycled concrete with fly ash and ground granulated blast-furnace slag
> Proceedings of the Institution of Civil Engineers - Structures and Buildings
Published: 21 July 2026
Figure 3. Direct current ( DC ) power supply A D C power supply shows ampere, milliampere, and voltage controls with output terminals. More about this image found in Direct current ( DC ) power supply A D C power supply shows ampere, mill...
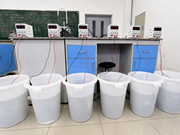
in Multiscale chloride resistance of recycled concrete with fly ash and ground granulated blast-furnace slag
> Proceedings of the Institution of Civil Engineers - Structures and Buildings
Published: 21 July 2026
Figure 4. Diagram of electrochemical accelerated corrosion test A laboratory setup shows six D C power supplies connected by cables to six plastic buckets. More about this image found in Diagram of electrochemical accelerated corrosion test A laboratory setup...
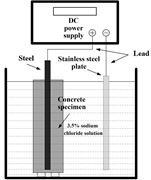
in Multiscale chloride resistance of recycled concrete with fly ash and ground granulated blast-furnace slag
> Proceedings of the Institution of Civil Engineers - Structures and Buildings
Published: 21 July 2026
Figure 5. Schematic diagram of electrochemical accelerated corrosion test A schematic diagram shows an impressed current corrosion test setup with a concrete specimen. The setup includes a D C power supply connected by leads to a steel bar embedded in a concrete specimen and to a stainless-ste... More about this image found in Schematic diagram of electrochemical accelerated corrosion test A schema...
in Multiscale chloride resistance of recycled concrete with fly ash and ground granulated blast-furnace slag
> Proceedings of the Institution of Civil Engineers - Structures and Buildings
Published: 21 July 2026
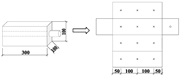
Figure 6. Measurement point layout diagram A schematic diagram shows a concrete specimen and a measurement grid with dimensions. The diagram shows a concrete specimen with dimensions of 300 by 100 by 100. A cylindrical steel bar projects from one end of the specimen. An arrow indicates a trans... More about this image found in Measurement point layout diagram A schematic diagram shows a concrete sp...
in Multiscale chloride resistance of recycled concrete with fly ash and ground granulated blast-furnace slag
> Proceedings of the Institution of Civil Engineers - Structures and Buildings
Published: 21 July 2026
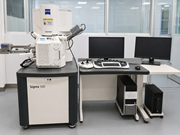
Figure 7. Scanning electron microscope equipment A scanning electron microscope setup shows a Zeiss Gemini Sigma 500 with monitors and control units. More about this image found in Scanning electron microscope equipment A scanning electron microscope se...
in Multiscale chloride resistance of recycled concrete with fly ash and ground granulated blast-furnace slag
> Proceedings of the Institution of Civil Engineers - Structures and Buildings
Published: 21 July 2026
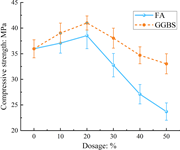
Figure 8. Variation of compressive strength of RAC with single incorporation of FA and GGBS A line graph shows compressive strength changes by F A and G G B S dosage. The vertical axis gives compressive strength in megapascals, from 20 to 45. The horizontal axis gives dosage in per cent,... More about this image found in Variation of compressive strength of RAC with single incorporation of FA...
in Multiscale chloride resistance of recycled concrete with fly ash and ground granulated blast-furnace slag
> Proceedings of the Institution of Civil Engineers - Structures and Buildings
Published: 21 July 2026
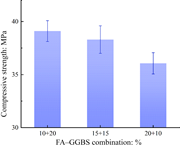
Figure 9. Effect of combined FA and GGBS incorporation on the compressive strength of RAC A bar chart shows compressive strength for three F A, G G B S combinations. The vertical axis gives compressive strength in megapascals, from 30 to 40. The horizontal axis gives F A, G G B S combina... More about this image found in Effect of combined FA and GGBS incorporation on the compressive strengt...
in Multiscale chloride resistance of recycled concrete with fly ash and ground granulated blast-furnace slag
> Proceedings of the Institution of Civil Engineers - Structures and Buildings
Published: 21 July 2026
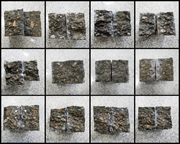
Figure 10. Split section of RAC specimens after accelerated chloride penetration and silver nitrate colour development Twelve panels show fractured aggregate specimens on a speckled surface. More about this image found in Split section of RAC specimens after accelerated chloride penetration and...
in Multiscale chloride resistance of recycled concrete with fly ash and ground granulated blast-furnace slag
> Proceedings of the Institution of Civil Engineers - Structures and Buildings
Published: 21 July 2026
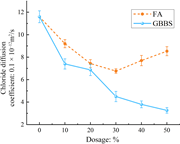
Figure 11. Effect of single incorporation of FA and GGBS on the chloride migration coefficient of RAC (w/b = 0.55) A line graph shows chloride diffusion coefficient changes by F A and G B B S dosage. The vertical axis gives chloride diffusion coefficient, 0.1 times 10 negative 12 square metres per second, from 2 to 12. The horizontal axis gives dosage in per cent, from 0 to 50. F A decreases from about 11.6 at 0 per cent to 9.2 at 10 per cent, 7.5 at 20 per cent, and 6.8 at 30 per cent, then increases to 7.7 at 40 per cent and 8.5 at 50 per cent. G B B S decreases from about 11.6 at 0 per cent to 7.4 at 10 per cent, 6.9 at 20 per cent, 4.5 at 30 per cent, 3.8 at 40 per cent, and 3.3 at 50 per cent. Both series include error bars. More about this image found in Effect of single incorporation of FA and GGBS on the chloride migration...
in Multiscale chloride resistance of recycled concrete with fly ash and ground granulated blast-furnace slag
> Proceedings of the Institution of Civil Engineers - Structures and Buildings
Published: 21 July 2026
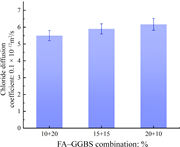
Figure 12. Effect of combined FA–GGBS incorporation on the chloride migration coefficient of RAC (w/b = 0.55) A bar chart shows chloride diffusion coefficients for three F A, G G B S combinations. The vertical axis gives chloride diffusion coefficient, 0.1 times 10 negative 12 square metres per second, from 0 to 7. The horizontal axis gives F A, G G B S combination in per cent. The 10 plus 20 combination has a value of about 5.5. The 15 plus 15 combination has a value of about 5.9. The 20 plus 10 combination has a value of about 6.2. Each bar includes an error bar. More about this image found in Effect of combined FA–GGBS incorporation on the chloride migration coeffici...
in Multiscale chloride resistance of recycled concrete with fly ash and ground granulated blast-furnace slag
> Proceedings of the Institution of Civil Engineers - Structures and Buildings
Published: 21 July 2026
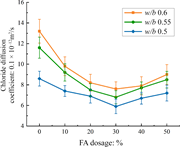
Figure 13. Chloride migration coefficient of RAC with single FA incorporation under different w/b ratios A line graph shows chloride diffusion coefficient by F A dosage and water to binder ratio. The vertical axis gives chloride diffusion coefficient, 0.1 times 10 negative 12 square metres per second, from 4 to 16. The horizontal axis gives F A dosage in per cent, from 0 to 50. At water to binder ratio 0.6, the value decreases from about 13.1 at 0 per cent to 7.6 at 30 per cent, then increases to 8.9 at 50 per cent. At water to binder ratio 0.55, the value decreases from about 11.6 at 0 per cent to 6.8 at 30 per cent, then increases to 8.5 at 50 per cent. At water to binder ratio 0.5, the value decreases from about 8.6 at 0 per cent to 5.9 at 30 per cent, then increases to 7.2 at 50 per cent. All series include error bars. More about this image found in Chloride migration coefficient of RAC with single FA incorporation unde...
in Multiscale chloride resistance of recycled concrete with fly ash and ground granulated blast-furnace slag
> Proceedings of the Institution of Civil Engineers - Structures and Buildings
Published: 21 July 2026
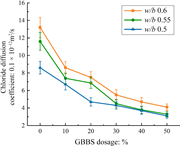
Figure 14. Chloride migration coefficient of RAC with single GGBS incorporation under different w/b ratios A line graph shows chloride diffusion coefficient by G B B S dosage and water to binder ratio. The vertical axis gives chloride diffusion coefficient, 0.1 times 10 negative 12 square metres per second, from 2 to 16. The horizontal axis gives G B B S dosage in per cent, from 0 to 50. At water to binder ratio 0.6, the value decreases from about 13.2 at 0 per cent to 4.1 at 50 per cent. At water to binder ratio 0.55, the value decreases from about 11.6 at 0 per cent to 3.3 at 50 per cent. At water to binder ratio 0.5, the value decreases from about 8.6 at 0 per cent to 3.1 at 50 per cent. All series include error bars. More about this image found in Chloride migration coefficient of RAC with single GGBS incorporation un...
in Multiscale chloride resistance of recycled concrete with fly ash and ground granulated blast-furnace slag
> Proceedings of the Institution of Civil Engineers - Structures and Buildings
Published: 21 July 2026
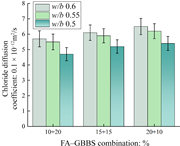
Figure 15. Chloride migration coefficient of RAC with combined FA–GGBS incorporation under different w/b ratios A grouped bar chart shows chloride diffusion coefficients for F A, G B B S combinations and water to binder ratios. The vertical axis gives chloride diffusion coefficient, 0.1 times 10 negative 12 square metres per second, from 0 to 8. The horizontal axis gives F A, G B B S combination in per cent. For 10 plus 20, values are about 5.7 at water to binder ratio 0.6, 5.5 at 0.55, and 4.7 at 0.5. For 15 plus 15, values are about 6.1 at 0.6, 5.9 at 0.55, and 5.2 at 0.5. For 20 plus 10, values are about 6.5 at 0.6, 6.2 at 0.55, and 5.4 at 0.5. Each bar includes an error bar. More about this image found in Chloride migration coefficient of RAC with combined FA–GGBS incorporation...
in Multiscale chloride resistance of recycled concrete with fly ash and ground granulated blast-furnace slag
> Proceedings of the Institution of Civil Engineers - Structures and Buildings
Published: 21 July 2026
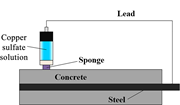
Figure 16. Principle of half-cell potential measurement A schematic diagram shows a copper sulphate solution test setup on concrete and steel. The setup includes a concrete block containing a steel bar, a sponge placed between the concrete surface and the solution container, and a copper sulph... More about this image found in Principle of half-cell potential measurement A schematic diagram shows a...
in Multiscale chloride resistance of recycled concrete with fly ash and ground granulated blast-furnace slag
> Proceedings of the Institution of Civil Engineers - Structures and Buildings
Published: 21 July 2026
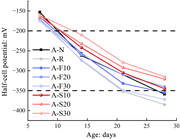
Figure 17. Trend of half-cell potential variation in ordinary and recycled concrete at different ages A line graph shows half-cell potential changes with age for eight mixes. The vertical axis gives half-cell potential in millivolts, from negative 150 to negative 400. The horizontal axis gives... More about this image found in Trend of half-cell potential variation in ordinary and recycled concrete at...