This article will explain how SoftChalk LessonBuilder can be used to take content that you have already created and quickly develop it into an attractive, interactive Web lesson. Once the lesson is created, it can then be uploaded into any learning management system.
Instructors are realizing that an online course should be more than just a syllabus and a discussion forum. Many instructors are creating content for their online classes that is engaging to the student as well as informative. Instructors realize that online classes lose some of the interactions that happen in a face-to-face environment, online instructors are attempting to compensate for that loss by creating lessons that will engage their students. The problem is learning how to create that engaging content.
Typically, instructors who want to create an online lesson may shy away from creating their Web content because they do not have the time or energy to learn how to take content they may already have and transform that content into a Web page or series of Web pages. Programs like Adobe Dreamweaver and Microsoft FrontPage are just too difficult for the normal instructor to learn, and once learned are difficult to use on an occasional basis. These are professional design tools that are not really intended for the casual user or for instruction. Creating engaging interactive lessons is even more frustrating for the normal instructor. Learning Flash and creating Flash interactions may seem like an impossible task. As a result, many instructors have not developed Web lessons because they refuse to display an inferior product. Some schools are trying to compensate for this problem by have all Web pages created by the instructional design staff; this really puts a burden on that staff. LessonBuilder can save many hours of frustration. This program fills the void for instruction, as it was created specifically for instruction. The tools are simple to use, yet allow the instructor to create effective online learning content.
Creating interesting interactive content for online courses has finally gotten easier. If you already have content created in Microsoft Word you can quickly and easily change your handouts to a professionally designed interactive Web lesson.
EXAMINING LESSONBUILDER
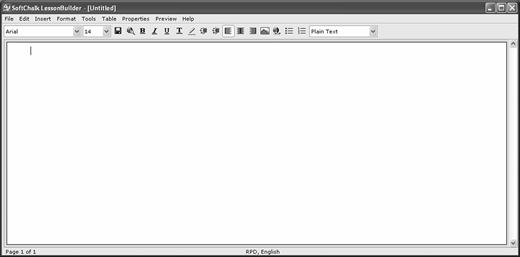
First I should mention that LessonBuilder was created in Java Web Start. This is important because using this medium the program will work on both Windows and Macintosh platforms. The program is not a Web application; rather, it is a desktop application. This allows you to work in the program even if you do not have access to the Internet. Figure 1 shows the application window. Notice how it looks similar to Word 2003 in its appearance. The tools should be readily apparent to most.
You may type directly in the window to create your content, or you can copy from your word processor and paste into the window. When you paste from Microsoft Word, the program will remove all of the Word background information. It does retain the formatting, such as boldface and italics, as well as bulleted or numbered text and heading styles. Also, any graphics that you might have included in your word handout are also included when pasting into LessonBuilder.
NAVIGATION
Creating navigation in LessonBuilder is simple; you can create navigation within a page or navigation between pages. To create navigation within a page, there are two required steps. First the heading or section title must be a style. This style can either be a page heading, subheading one, or subheading two. The styles are chosen by clicking on the styles option on the LessonBuilder toolbar. If you have used heading styles in Microsoft Word, those styles are converted into the styles shown in Table 1.
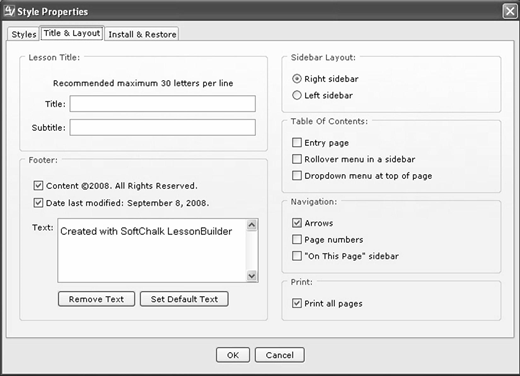
The second step is to activate the on-page display. This is accomplished by showing the properties dialog box and selecting the Titles and Layout tab. The dialog window is displayed in Figure 2.
Just select the "On This Page" sidebar, and you will have on-page navigation. Page navigation is also activated on this window. LessonBuilder remembers your choices, so if you create a second lesson it will use the same options as your first lesson. This can be helpful to achieve a consistent look for all your Web lessons.
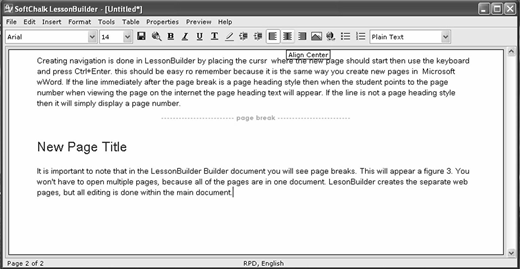
Creating page navigation in LessonBuilder is done by placing the cursor where the new page should start, then using the keyboard and pressing Ctrl+Enter. This should be easy to remember because it is the same way you create new pages in Microsoft Word. If the line immediately after the page break is a page heading style, then when the student points to the page number, when viewing this page on the Internet, the page heading text will appear. If the line is not a page heading style, then it will simply display page #.
It is important to note that, in the LessonBuilder document, you will see the page breaks. This will appear as shown in Figure 3. You will not have to open multiple pages, because all of the pages of your lesson are shown in one document. LessonBuilder creates the separate Web pages, but all editing is done within the main document.
LESSON STYLES
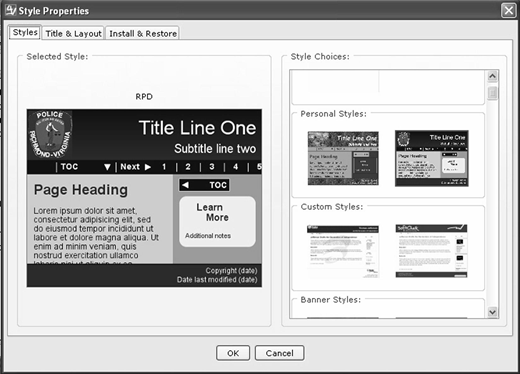
LessonBuilder is similar to Microsoft PowerPoint, in that it gives you the ability to choose from many different Web page styles. You choose a look from a list of over 40 styles, and your entire lesson is changes to that style. Figure 1 shows that the current style is Pens banner. Notice the current style name is located at the bottom center of the LessonBuilder window.
To change the style, open the Style Properties dialog window (see Figure 4) and scroll through the styles. Click on the style you would like and then choose OK. Rather than a long, drawn-out process, the LessonBuilder creators have decided to make most of their choices and options very easy.
If your school would like the school's branding added to the Web pages, this is available. Although you do not have the ability to modify or create your own styles, SoftChalk will create a custom style just for your school. This custom style would then appear at the top of your styles list and will give your entire school a consistent look.
INSERTING A Graphic
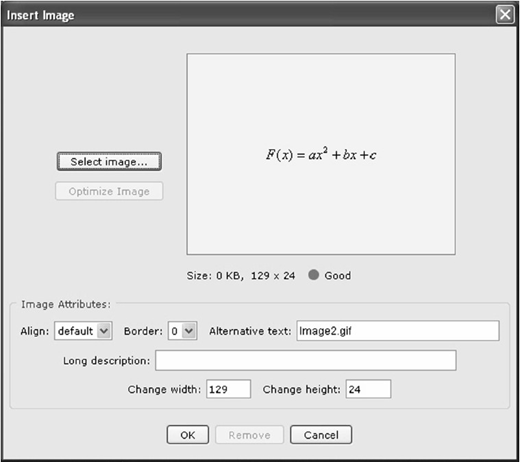
LessonBuilder allows you to place standard Web-ready graphics on your Web pages. There is no graphic editing capability in the program, so your graphic will have to be ready for placement. Since this will be on the Web, you will have to have your graphic stored as either jpg, gif, or png. Once your graphic is ready, insert it in your lesson by choosing Image from the Insert menu. This will display the insert image dialog box (see Figure 5). After you select the image to be inserted, you should change the default location for the image. Changing the default location to left or right will allow text to wrap around the image. If you do not want text to wrap, then you will need to add blank lines to move the text off the image.
The long description option should be used to describe what the graphic represents. The long description options are read by screen readers, thus making your lesson Americans with Disabilities Act compliant. You can change the height or width of the image. I found this a little awkward, because the units are in pixels. The options for an image may be edited by right-clicking on the image and then choosing Edit Image. You may also find the display in the LessonBuilder window a little annoying. The graphic does not show in the position selected, nor does it show the wrapped text. After talking with many LessonBuilder users, I have come to the conclusion that this is not a major drawback.
INSERTING MEDIA
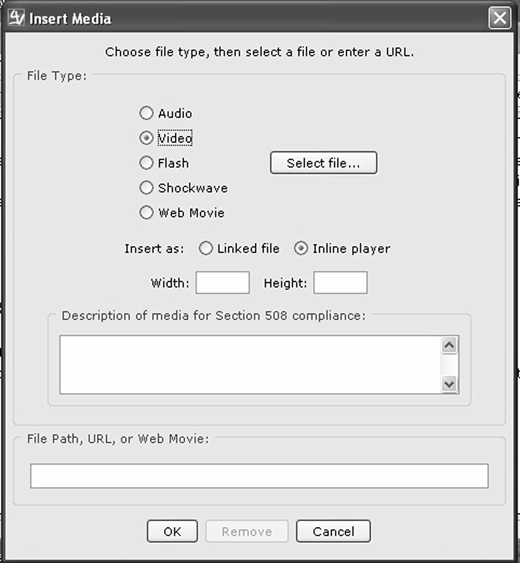
LessonBuilder will allow you to insert different types of media into your lesson. You may include audio files, video files, Flash files, and Shockwave files. If you have access to a streaming video server, you may also include the streaming path to add that content to your lesson. You cannot edit the media in LessonBuilder. To insert media into a lesson, you place the cursor and then choose Media from the Insert menu (see Figure 6).
If the file you want to use is located on your local hard drive or school server, you will select the type of media and then select the file. There are two options for displaying the media you select. It may appear in a separate window if you choose "Linked File," or it may appear in your current lesson window, if you choose "Inline Player." If you do select inline player, you will have to indicate the width and height of the video. This may involve some guesswork, so you may have to try several different values until the video fits. If you are going to use a streaming video server, you should still select Video as the type, and also if it is to be inline or linked, then you will type the URL for the video. The video options may be edited by right mouse clicking on the object and then selecting Edit Media.
INTERACTIONS
One of the key features of LessonBuilder is the ability to easily create interactions with the students. The interactions may be as simple as a quiz or as complex as a graphic hot spot roll-over.
TEXT POPPERS
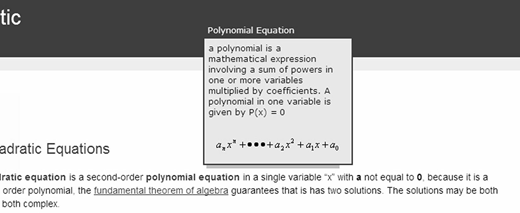
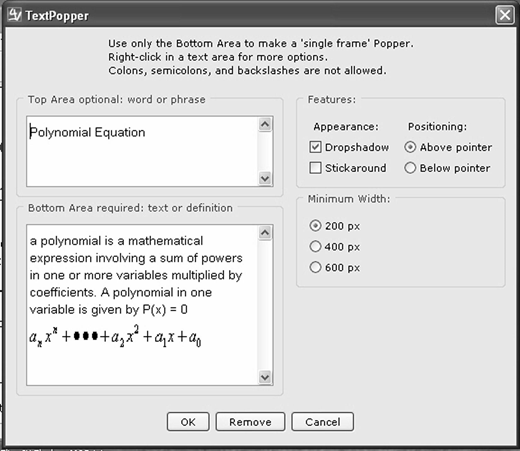
A text popper is a simple interaction. The student rolls over a word and another window pops up. (Note: It is important that some of the security settings in Microsoft Windows Explorer be changed to allow this to happen.) An example of a text popper is shown in Figure 7. The text popper may include a graphic, an equation, a hyperlink, and even audio or video.
To create a text popper, all you need to do is select a word or phrase, then choose Text Popper from the insert menu, fill in the form, and you are done. See Figure 8 for an example.
To enhance the text popper by including other media, just right mouse click anywhere in the definition window. Then, choose the option from the menu.
QUIZ QUESTIONS
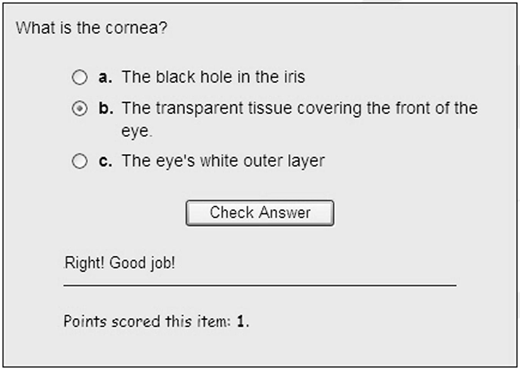
Making sure your students understand the material presented is an important aspect of any instruction. With LessonBuilder you can create self-assessment questions anywhere in the lesson. These questions could be true/false, multiple choice, short answer, matching, multiple answer, and ordering. The questions may include graphics or equations, as well as media files. When students answer the question, they immediately get feedback to let them know if their answer it correct or incorrect (see Figure 9). The feedback the students receive is changeable, and the students will see their cumulative score for the entire lesson
LessonBuilder is SCORM- (Sharable Content Object Reference Model) compliant, so if you are using a SCORM-compliant learning management system you can have LessonBuilder place the score into the learning management systems' grade book. It is important to realize that LessonBuilder is not online testing software. The questions that you generate are for self-assessment. You cannot create a bank of questions and have LessonBuilder randomly insert the questions.
To create the question, you choose Quiz Popper from the Insert menu, then choose the type of question you want to select. One option you can select is whether or not to hide the question. As shown in Figure 9, the question is not hidden. If the question were hidden, the student would only see the icon “Quiz Me." You also have the ability to change the point value for the question and allow the students to try answering the question more than once if they get a wrong answer.
ACTIVITIES
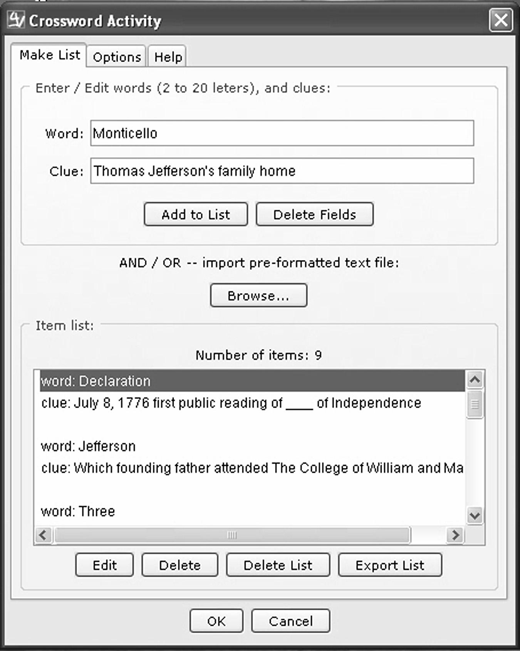
Another exciting feature of LessonBuilder is the ability to quickly create Flash-based activities without learning Flash. There are eight different activities in LessonBuilder. Some are text based and others are graphic based. The activities can be created by filling in a form for the text-based activities, and following a guide for the graphic-based activities. Figure 10 shows a typical form for a text-based activity.
You just have to type the words and then the clues to create a crossword puzzle. The activities in LessonBuilder may also be graded. This allows you to created activities and have them be part of the participation grade that would be entered in the grade book in your SCORM-compliant learning management system. The options that are available are: allow your student to restart the activity, determine if the activity should open in a new window or be part of your lesson window, and determine the point value of the activity.
The SoftChalk Web site shows demonstrations of how to create all of the activities. I encourage you to go to their Web site to see how easy it is to create interesting, interactive activities.
FINISHING A LESSON
Once you have finished your lesson, the final step is to get the lesson into your learning management system. LessonBuilder once again has made this task simple. First, you package the lesson. The package process allows you to select either a zip file or a SCORM file. If you want your lesson to be entered into the grade book you choose SCORM; otherwise, choose zip. Once the lesson has been packaged, you then upload the file into your course management system. LessonBuilder has been tested with most of the popular systems—Moodle, Desire2Learn, Angle, Blackboard, and WebCT.
CASE STUDIES
I have contacted SoftChalk and received their permission to display their case studies that talk about the benefits of using LessonBuilder. The following is an excerpt from one case study.
The Maricopa County Community College District is one of the largest higher education systems in the world and the largest provider of health care workers and job training in Arizona. Ten colleges make up the district, and although they have not agreed on any single Learning Management System they did unanimously select SoftChalk's LessonBuilder as the preferred tool for building instructional content and for developing Reusable Learning Objects (RLOs).
According to Roger Yohe, director of the Center for Teaching and Learning at Estrella Mountain Community College, LessonBuilder is used to design course templates that are essentially "ready-to-go." This allows the college to quickly add high-demand course sections based on enrollment trends. While it is important to faculty at Estrella to present students with consistencies in course syllabi, they objected to the “one-size-fits-all" nature of the templates that had previously been designed in a word processing application.
The implementation of LessonBuilder solved the problem and enabled both a standard and diversity by using a combination of software features, particularly cascading stylesheets.
An English Department faculty member at Glendale Community College, Mary Jane Onnen, utilizes the LessonBuilder software in another unique manner. She has been using LessonBuilder in her developmental reading class for the last several years. Previously, she had used the SoftChalk software to reformat "text-dense" reading selections, adding subtitles and developing comprehension questions for students. This past semester she had her students do basically the same thing, and found it to be a great way to assess how carefully the students read the material. Students turned in their assignments developed with LessonBuilder and then the instructor annotated the page to provide them feedback. Students were intrigued by the process and the SoftChalk product, which resulted in the purchase of an institutional Student License package for the college.
The increasing development of a wide range of teaching tools amongst faculty in the district led to the development of the Maricopa Learning Exchange (MLX), a repository for reusable learning objects (RLOs) (see www.mcli.dist.maricopa.edu/mlx). The MLX provides an easy way to upload learning objects into a database that can be searched by all faculty in the ten colleges that make up the district. SCORM compliance is an important requirement, both for creating content that is easily transported and used in other technologies, and for tagging RLOs for searching purposes. With its built-in SCORM compliance, LessonBuilder easily fulfills these requirements and integrates seamlessly with the repository.
CONCLUSIONS
Creating attractive Web lessons no longer has to be a tedious and labor-intensive operation. As the case studies above show, the uses of LessonBuilder are many. LessonBuilder can be used to create reusable learning objects and SCORM-compliant content. It can be used in a completely online environment or in a blended class. It can be used by a design expert or a novice teacher. In short, you will find your experience with LessonBuilder to be a productive one. You really can take a handout and create a professionally-designed Web lesson within an hour.
If you would like more information about SoftChalk LessonBuilder, you can visit their Web site located at http://www.softchalk.com
About the author