Book recommended for 1st grade–5th grade.
Lesson recommended for 3rd grade–5th grade.
This lesson is designed for 6 periods.
Book summary
Gifts from the Garbage Truck: A True Story about the Things We (Don’t) Throw Away by Andrew Larsen is a heartwarming and thought-provoking nonfiction, biographical picture book that invites readers to reimagine waste, not as something to be discarded, but as something with hidden potential. Inspired by the true story of Nelson Molina, a New York City sanitation worker, the book follows his remarkable journey of transforming discarded items into treasured objects. Rooted in his childhood in East Harlem, where his mother taught him not to waste anything usable, Molina began saving objects from the trash during his daily sanitation routes. Instead of seeing garbage, he saw treasure. His growing collection, now housed in a museum, became a tribute to the idea that even what seems worthless can be valuable again.
Themes include the following: a dream, upcycling, the four Rs (reduce, reuse, recycle, and rethink), sustainability, creativity, and community.
Lesson overview
In this series of lessons, students examine the environmental problems brought by excessive trash, explore the difference between materials and resources, and investigate how materials can be transformed into something useful through the concept of upcycling. Using the true story, Gifts from the Garbage Truck, by Andrew Larsen, students learn how Nelson Molina found value in what others considered trash, ultimately building a museum of upcycled and recycled objects. Students will deepen their understanding through discussion, hands-on exploration, and a collaborative upcycling design project that promotes creativity, environmental awareness, and critical thinking, applying their learning to real-world problems. This lesson was designed using the 5E Instructional Model (Engage, Explore, Explain, Elaborate, and Evaluate) of inquiry-based learning (Table 1).
Lesson plan overview
| Lessons | Duration | Topic |
|---|---|---|
| Engage and Explore | 30 Min | Materials and Resources |
| Explain | 30 Min | “Gifts from the Garbage Truck: A True Story About the Things We (Don’t) Throw Away” –the concept of turning trash into treasure (resources) |
| Elaborate | 30 Min | Plan the Upcycling Project |
| Elaborate | 30 Min | Build the Upcycled Item |
| Elaborate | 30 Min | Present the Upcycled Item |
| Elaborate | 30 Min | Engage in the Iteration Process |
| Evaluate – “Materials v. Resources” Handout (see Appendix 2); “During Reading Graphic Organizer” (see Appendix 3); teacher’s observation during group work, group project, and the reflection paper ( Appendix 4) | ||
NCSS themes
3. People, Places, and Environment
7. Production, Distribution, and Consumption
C3 framework standards
D2.Eco.3.3–5. Identify examples of the variety of resources (human capital, physical capital, and natural resources) that are used to produce goods and services.
D2.Geo.4.3–5. Explain how culture influences the way people modify and adapt to their environments.
Materials
Printed copies of Appendix 2– Appendix 4
The book–Gifts from the Garbage Truck: A True Story About the Things We (Don’t) Throw Away–by Andrew Larsen
Computer/projection system to view YouTube video “The World’s Trash Problem Just Got More Alarming” (1.22 min) Link to the website and take an online tour of Nelson Molina’s Museum at Tour Nelson Molina’s Museum Link to the website
Basic supplies: safety scissors, glue sticks, tape, staplers, markers/crayons/colored pencils.
“Upcycling Bin” – possible materials to add to the bin, which can include empty cereal boxes, cardboard rolls, plastic containers, old t-shirts, socks, bottle caps, broken toys, scrap papers, fabric, buttons, old magazines, newspapers, and egg cartons.
Sticky notes
Objectives
Engage and explore: students will be able to:
Distinguish between materials and resources, providing examples of each.
Describe how materials can be considered resources.
Explain: students will be able to:
Analyze and explain how the main character in Gifts from the Garbage Truck transforms discarded materials into meaningful resources.
Elaborate: students will be able to:
Connect the story to environmental issues and identify real-life examples of how people transform materials into resources.
Collaboratively design and create an upcycled product using classroom and home-collected materials.
Reflect on the creative process and environmental impact of upcycling.
Engage in the iteration process by offering and seeking feedback to improve upcycled items.
A note to the teacher before beginning the lesson
Create a classroom “upcycling bin” where students can collect materials throughout the week before this lesson starts. Encourage students to collect unwanted items from their homes. This “upcycling bin” will become handy when students work on their “Design Your Own Upcycling Project.”
If teachers cannot find the exact materials listed in this lesson plan, please note that substitutes are acceptable – any suitable materials will work. Instead of buying these materials new, teachers can consider shopping at local thrift stores or soliciting donations from the parents.
Engage and explore
Estimated time to complete: Approximately 30 min
Objective: students will be able to:
Distinguish between materials and resources, providing examples of each.
Describe how materials can be considered resources.
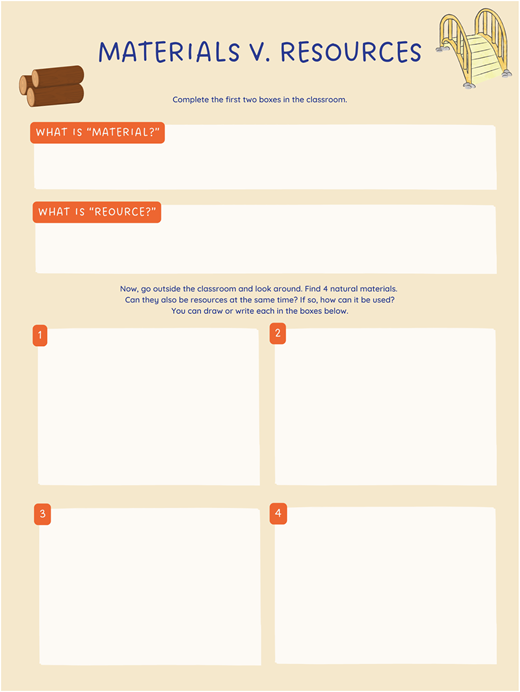
Assessment Method: “Materials v. Resources” Handout (see Appendix 2).
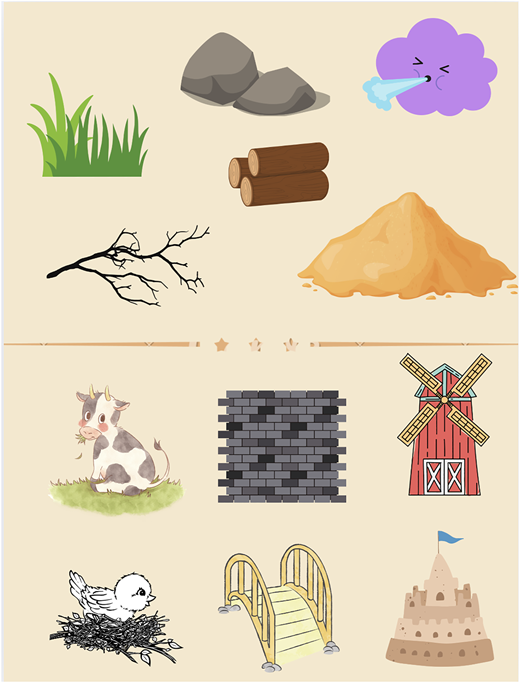
[5 min] Look and Wonder: Project Appendix 1 on the board in front of the classroom. Put students into small groups of three or four and ask them to discuss two questions:
What do you see in the upper section and the lower section of the page?
Why do you think I group them in this way? Allow groups to discuss for about two minutes and call on volunteers to share their answers. Let students share their thoughts freely. It is okay if their answers are not accurate at this point.
[5 min] Introduce the two concepts:
Material: anything in the world can be a material, such as the air, sunshine, river, rocks, snow, dirt, etc.
Resource: the materials that help us do something. For example, dirt can be used to make roads; snow can be melted and then filtered to drink; sunshine is necessary for our gardens to grow.
Ask students to come up with examples for each concept and explain why they are relevant.
Refer back to the image students saw at the beginning of the class ( Appendix 1). Ask students: Why do you think I group them in this way? At this point, students should be able to answer this question correctly.
[15 min] Activity:
Distribute the “Materials v. Resources” handout ( Appendix 2). Give students a few minutes to complete the first two boxes.
Take the students outside the classroom (in front of the building or the playground). Ask students to look around and find four natural materials. Consider whether each can serve as a resource at the same time. Why or why not? Write or draw them in each box.
[5 min] Closure:
Take students back to the classroom.
Collect student handouts.
Inform students that in the next class, they will read a true story about a young boy from New York City who was skilled at turning materials into resources. Eventually, after growing up, he opened his own “treasure” museum, showcasing the materials he had collected over the years.
Assessment: Collect student handouts ( Appendix 2) to check students' understanding.
Explain
Estimated time to complete: approximately 30 min.
Objective: The students will be able to analyze and explain how the main character in Gifts from the Garbage Truck transforms discarded materials into meaningful resources.
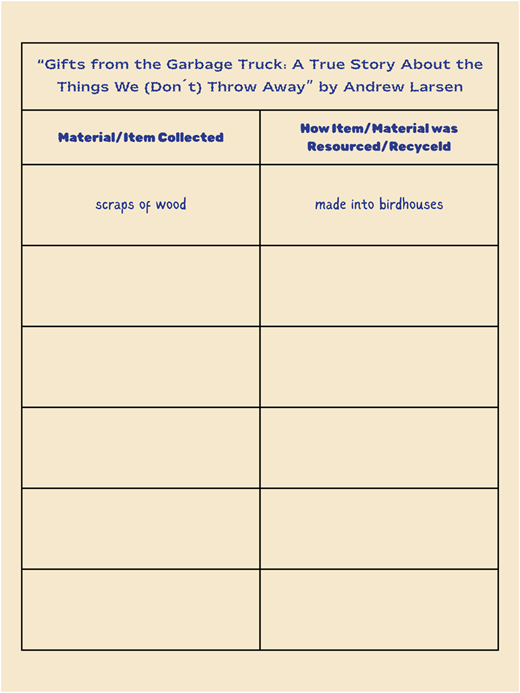
Assessment Method: “During Reading Graphic Organizer” (see Appendix 3).
[5 min] Explain to students why trash is problematic: As the population grows, more people buy and use things, which means more trash (food waste, plastic, and stuff gets thrown away). Cities and towns must collect and dispose of trash, typically in landfills. Landfills fill up fast, and some places do not have the space or systems to manage it all. Landfills can also be problematic because they can release harmful gases and chemicals into the air and ground. This pollution can harm the environment and our ecosystems. As a society and as individuals, we should be more aware of the products we buy and the items we throw away. In fact, many items we throw away can be reused or recycled.
View Video “The Worlds Trash Problem Just Got More Alarming” (1.22 min) Link to the website
After watching the short video, ask the following two discussion questions:
What problems do you see from the video?
What are some of the solutions that different nations come up with to solve the problem?
(2) [5 Min] Introduce the book Gifts from the Garbage Truck: A True Story About the Things We (Don’t) Throw Away:
Gifts from the Garbage Truck: A True Story About the Things We (Don’t) Throw Away is a true story about Nelson Molina, who, as a boy, discovered that what many people consider trash can be repurposed to create something useful. When he grew up, he worked as a sanitation worker and continued to turn trash into treasure. He eventually opened a museum so others could enjoy his creations. Consider adding a prompt like “We will be reading to find out what trash (materials) Nelson Molina collects and how the trash becomes treasures (resources or restored value).”
Make connections to the previous lesson “he was good at turning materials into resources” during the introduction.
Distribute Graphic Organizer ( Appendix 3). Explain to students, during reading, they will record the following:
- –
Materials/Items Nelson Molina Found
- –
How Nelson Molina Resourced/Recycled Materials/Items
- –
Students should record at least four materials/items that Nelson found and how they were reused or recycled.
The teacher reads aloud Gifts from the Garbage Truck: A True Story About What We (Don’t) Throw Away. During the reading, students complete the graphic organizer ( Appendix 3), recording at least four items/materials that Nelson found and how they were resourced or recycled. For example:
- –
Stamps (material/item) into colorful collections/reminders of dad’s travels (resourced/recycled)
- –
Broken toy garbage truck (material/item) into new/fixed/gifted toy garbage truck (resourced/recycled)
- –
Old toys (material/item) into Christmas gifts (resourced/recycled)
- –
Toys (material/item) into collections or displays (resourced/recycled)
- –
Teapots (material/item) into collections or displays (resourced/recycled)
- –
Yoyos (material/item) into collections or displays (resourced/recycled)
- –
Photos (material/item) into collections or displays (resourced/recycled)
- –
[10 min] Closure:
Whole group discussion of the graphic organizer (ways Nelson Molina transformed/recycled materials into usable/valuable resources).
Collect the graphic organizer ( Appendix 3)
Take an online Tour of Nelson Molina’s Museum: Link to the website
Discuss: How did Nelson’s actions relate to the idea of materials and resources? (Answers may vary, but they should be around this idea: People throw away what they consider waste/trash, which is no longer useful or valuable to them [i.e., materials]. However, Nelson sees the value of these materials and turns them into something valuable [i.e., resources]).
Assessment: Collect student handouts ( Appendix 3) to check students' understanding.
Elaborate
Estimated time to complete: approximately four class periods, 30 min per period.
Objectives: The students will be able to:
Connect the story to environmental issues and identify real-life examples of how people transform materials into resources.
Collaboratively design and create an upcycled product using classroom and home-collected materials.
Reflect on the creative process and environmental impact of upcycling.
Engage in the iteration process by offering and seeking feedback to improve upcycled items.
Assessment method: Teacher’s observation during group work, group project, and a reflection paper (see Appendix 4)
1st period: Upcycling
[5 min] Opening discussions:
What’s the name of the character we read about in the last class? (Nelson Molina)
What did he do? (Answers may vary but should be around the idea of how Nelson turned materials into resources, which eventually led to his museum.)
Can you provide some examples of the resources Nelson created from the materials he collected from the garbage truck? (As students offer examples from the book, the teacher writes them down on the board.)
[5 min] About “upcycling”:
Ask students: What materials do your families usually throw away? Write down their answers on the board. Then, select one item from the answers and provide an idea on how to repurpose it. For example, the teacher can say, I see Liam mentioning plastic water bottles. Instead of throwing them away, maybe I can turn them into bird feeders and hang them in my backyard. The process of turning something unwanted into something valuable is called “upcycling.”
Upcycling: taking old or used things and turning them into something new and better, instead of throwing them away. For example, you can turn an old t-shirt into a bag or decorate a jar to make a pencil holder. Many of the things that Nelson did (pointing to the answers from students on the board while saying this) are about upcycling.
[18 min] Design your own upcycling project:
Put students into small groups of three or four. (This project promotes collaboration and group work, so we do not recommend individual projects.)
Identify materials: In their groups, students brainstorm and write down on a piece of paper the items that would normally be tossed or recycled in their homes or schools. Teachers can show students some ideas from the Internet (see some ideas in the “Web-Based References” section of this lesson plan. Students can also consider the items in the “upcycling bin” in the classroom (see A note to the teacher before beginning the lesson). These might include:
- –
Empty cereal boxes or cardboard rolls
- –
Plastic containers or waste bottles
- –
Old T-shirts or socks
- –
Bottle caps or broken toys
- –
Scrap papers, fabric, or buttons
- –
Old magazines or newspapers
- –
Egg cartons
- –
Plan the project:
- –
As a group, choose the materials you will use from your list. Use these questions to help students form their projects: What valuable item could you make from these materials? Who would use it? How would it help someone?
- –
Each group will draw a picture of the idea and label the materials in their drawings.
- –
Below the drawing, students will write a short description of the plan: “We are going to make a ________using ___________. It can be used for ___________.”
- –
[2 min] Closure:
Inform students that they will bring the necessary materials for their plan the next time, so they can build the item during the next class period.
2nd period: Build the item
[5 min] Opening:
Let students know that they will use this class period to work with their group members and execute their upcycling plan.
Besides the materials students bring into the class from home (or from the “upcycling bin” in the classroom), provide each group with some basic supplies: safety scissors, tape, glue sticks, markers, crayons, colored pencils, and staplers.
Please inform students that they must complete their project within the next 20 min.
[20 min] Building time!
While students are working on their projects, the teacher should walk around the classroom and encourage students to try different approaches to make their design work if they encounter problems. Also, tell them it’s okay to modify their plan a little as they build.
[5 min] Closure:
Recognize students' hard work and team spirit. Inform them that each group will present its project in class the following day. Direct them to leave their projects in a designated area.
Collect all the basic supplies.
3rd period: Presenting
[10 min] Prep-time:
Allow each group to pick up their project from the designated area.
As a group, discuss the following questions:
- –
What did you make?
- –
What do you call your upcycled item? Give it a creative name!
- –
What materials did you use?
- –
What is your item used for?
- –
Who can benefit from it?
- –
What was fun or tricky about making it?
- –
[20 min] Presentations and closure:
Show your item to the class.
Please provide the answers to the questions from the previous step.
Following the presentations, ask students to bring their items to the designated area once again and reveal the name of this area: Upcycle Gallery.
4th period: Feedback and reflection
[15 min] Peer feedback activity-gallery walk
Students circulate among the upcycled items on display in the Upcycle Gallery and provide feedback using sticky notes, which will be left at each upcycled item accordingly.
After receiving peer feedback, students will regroup with their upcycling teams to read, discuss, and reflect on the feedback provided by their classmates.
[15 min] Reflection and closure
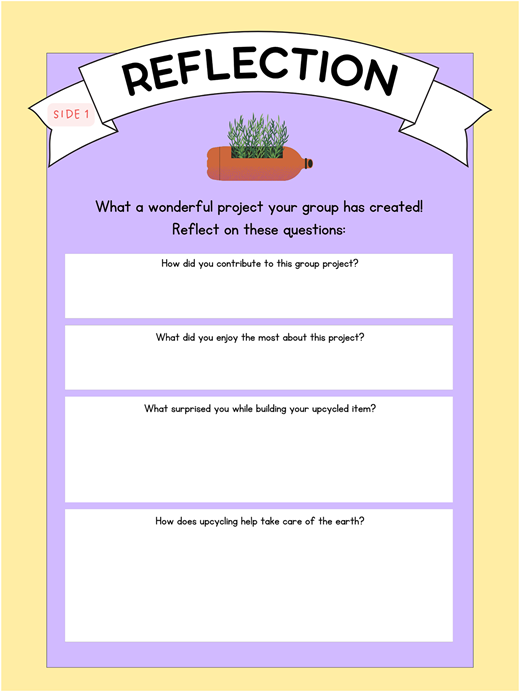
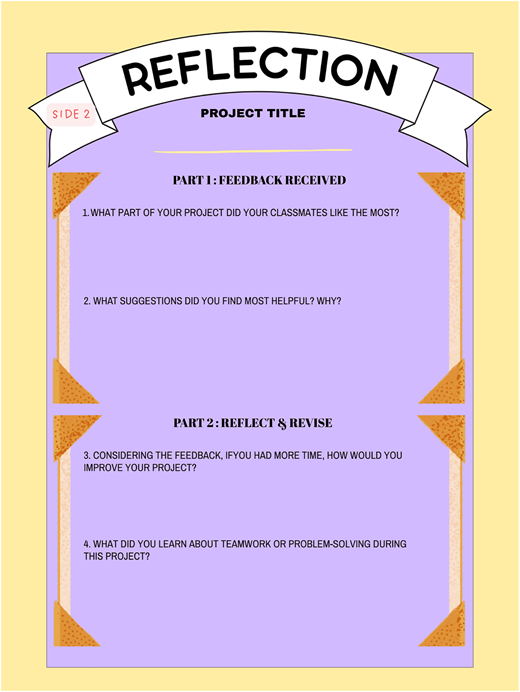
Distribute the reflection paper (see Appendix 4).
Students complete both sides of the reflection paper, reflecting on Side 1 – the project and creative process, their contributions to their project, and the concept of upcycling, and Side 2 – peer feedback and iteration reflection.
Assessment
Students will be assessed through:
Teacher’s observation during group work
Group project
Reflection paper ( Appendix 4)
Evaluation/assessment
Engage and Explore: “Materials v. Resources” Handout (see Appendix 2).
Explain: “During Reading Graphic Organizer” (see Appendix 3).
Elaborate: Teacher’s observation during group work, group project, and the reflection paper ( Appendix 4).
Suggested extension activities
Upcycling teams use Appendix 4 Side 2 (peer feedback) to make improvements to their upcycled item to engage them in the iteration process, seeking feedback to improve their work.
Continue the discussion on personal ways/commitments students can recycle or upcycle by viewing the Video “Reduce, Reuse, Recycle, Upcycle Lesson 3” Link to the website
This lesson includes Partner Talk questions:
How does the population impact the environment?
What is one thing you can reduce to make a change?
What is the difference between recycling and upcycling?
Appendix 1 Look and wonder
Appendix 2 “Materials v. resources” handout
Appendix 3 During reading graphic organizer
Appendix 4 Reflection paper
Web-based references
A Read Aloud of “Gifts from the Garbage Truck: A True Story About the Things We (Don't) Throw Away” Link to the website
Best out of waste – eco DIYs – Upcycling Ideas and Projects: Link to the website
Easy Recycling Art Project for Kids: Link to the website
Reduce, Reuse, Recycle, Upcycle Lesson Video Link to the website
Tour of Nelson Molina's Museum “Treasures in the Trash”
Trash to Treasure: Creative Recycled Crafts for Kids: Link to the website
UpCycle Creative Reuse Center – Lesson Plans: Link to the website